
Anyway, this might be a little boring for those of you who read my blog for fashion content, but a few people on Dayre actually seemed to like this topic, so maybe it might be a little interesting? It has a bit of college talk though. I'll try to include pictures where I can, but fair warning that this post will likely be text heavy since I didn't know I'd be writing a post about this and don't actually have a large variety of photos to go with each topic lol.
My "journey" to becoming a Geography major
I spent my freshman year at a private (expensive) college in California intending to be a graphic design major (after entering undeclared), and after the first semester, I kind of realized it wasn't worth it. After winter break, I decided to apply to the university back at home because I didn't really much care where I got my degree from - just as long as I received it, and so may as well pay in-state tuition right? Lol. I finished up my freshman year at the school in California and then started my 2nd year of college in Hawaii. I decided I no longer wanted to pursue graphic design at this new school, but I already had a few art classes under my belt, and I really wanted to finish my degree in 4 years so initially I thought I would change to Art History just because I had a few specific credits towards that already. During my first semester, I took a lot of general classes needed by this particular college and then decided maybe I wanted to be a Chinese major instead (which wasn't even an option at my first school). However, after I finished the first semester, I decided that probably wasn't the way to go for me after all, and sat down and tried to figure out what the heck I was doing lol. I basically went through the list of majors and clicked on anything that sounded remotely interesting and that allowed me to get my degree without putting in an additional 4 years and essentially starting from scratch. And Geography fit the bill!
[The reason I typed all that out instead of just simply telling you that I randomly picked Geography as my major was that I wanted to show that you don't have to to know what your major is when you first enter college or even know which college is right for you from the start and that you can make a change if you want to! I think a lot of (American) students feel a lot of pressure during their senior year of high school to pick the #1 best option, but hardly anyone knows what the "best option" is. And even if you think you do, your life/situation might change and then what used to be your best choice isn't anymore. I know it's not an option for every single person out there, but don't be afraid to make a change if that's what's right for you. Just because you pick a major freshman year doesn't mean you're absolutely stuck if you find the classes extremely boring or even too hard for you. You're unlikely to do well in school if you're absolutely hating and resenting it. I'm not advocating just giving up (because, of course, you should ask for help from TAs, teachers, advisors if you need it first), but just that you shouldn't feel chained down by one decision you made at 17 or 18 when it can be changed. I bounced around for a bit but I'm so happy I ended up where I did, and I feel like my life would hardly be the same if I had stuck with any of the previous 3 majors I had or made myself stay at the school I attended freshman year.]

Being a Geography (geotechnical) student
This is based on my experience at my university only. Many other schools have different programs with different emphases and components, but I will only be speaking about my personal experience and the program as it was when I attended UHM.
When most people think of Geography as a field of study, they think of memorizing countries, states, capitals, physical feature locations and things like that. That is certainly a component of Geography, but definitely not its entirety. Geography is a social science and essentially investigates place. The Geography program/major actually went through a little bit of restructuring while I was there but the major was separated into 3 "streams" - Human, Environmental and Geotechnical.
I'm not in school anymore and I don't feel like thinking too hard about this, so I'm just going to copy and paste the descriptions for each of those from the UHM catalog (<-- click for source) -
"Human geography investigates the cultural, economic, and political processes that shape human experiences on the Earth; the relationship between the environment, society, and culture; and the nature of place in the Asia-Pacific region.The way I see it, human geography studies the relationship between people and place and is somewhat similar to cultural anthropology to an extent. Environmental geography is kind of the science part where you study how places formed and why. The geotech side is creating maps and using geographical data. I mean, really it's using technology with geography lol.
Environmental geography engages in a systematic study of the Earth's physical environment (atmosphere, biosphere, hydrosphere, and lithosphere) and considers the challenges associated with natural resource management and global environmental change.
Geographic technologies include the study of cartography, geographic information systems (GIS), and remote sensing science."

I think one of the reasons I really enjoyed my classes was that I was learning something that was totally new to me. That, of course, also made it quite difficult at times, but I'm a student who enjoys a little bit of a challenge so things don't get too boring. I didn't even know GIS existed before I was a Geography major. And I never really thought about who made or designed maps, but there is certainly a need.
The GIS classes I took mainly dealt with ArcGIS. It's not a free software, but the school provided us with student copies that would expire after a year if we wanted to load the programs onto our own computers. Otherwise, we would have to use the lab computers. Since I was living reasonably close to campus at the time, I opted to use the school computers a lot because my laptop wasn't really meant to handle programs like that lol. Anyway, the GIS classes I took were mostly lab-based with some additional textbook reading. It's really one of those things that you kind of learn by doing though. We would often be trying to follow along with the teacher on our computers while he led the discussion on a projector screen. Once you kind of get the hang of what all the basic functions do, it's not that bad, but it really takes a little bit to get used to it.
.JPG) There's really a lot of components to GIS and I'm not going to go into the nitty gritty details here because this is already getting boring, but one of my favorite mapping activities/labs from school was suitability mapping. That's basically when you take spatial data and manipulate/interpret it to show suitable areas for a topic based on specific factors. For example, let's say that I want to build a retirement facility but don't know where to start looking for land to purchase. However, I do know that I would ideally like it to be close to at least one hospital and/or fire station, and I also don't want the land to be on a slope. Additionally, I don't want to go through the trouble of the political process that it would require to change the zoning for an area. So, I only want to look at areas that are OK to develop, have a hill slope of less than 15 degrees and are within 5 miles of the nearest hospital. Furthermore, I need at least 5 acres of land. I can use a program like ArcGIS to figure out where there is available land on Oahu based on those factors. I'll probably want to continue to narrow it down with better factors if I was actually looking to build a facility like that, but I think you get the picture. My result would be a map highlighting the suitable areas for my new retirement facility.
There's really a lot of components to GIS and I'm not going to go into the nitty gritty details here because this is already getting boring, but one of my favorite mapping activities/labs from school was suitability mapping. That's basically when you take spatial data and manipulate/interpret it to show suitable areas for a topic based on specific factors. For example, let's say that I want to build a retirement facility but don't know where to start looking for land to purchase. However, I do know that I would ideally like it to be close to at least one hospital and/or fire station, and I also don't want the land to be on a slope. Additionally, I don't want to go through the trouble of the political process that it would require to change the zoning for an area. So, I only want to look at areas that are OK to develop, have a hill slope of less than 15 degrees and are within 5 miles of the nearest hospital. Furthermore, I need at least 5 acres of land. I can use a program like ArcGIS to figure out where there is available land on Oahu based on those factors. I'll probably want to continue to narrow it down with better factors if I was actually looking to build a facility like that, but I think you get the picture. My result would be a map highlighting the suitable areas for my new retirement facility.Cartography classes really helped me fall in love with Geography, I think. First of all, I had a pretty great teacher. But second, it kind of paired my initial interested in graphic design with Geography! Basically cartography is map design so there somewhat of an "artistic" element to it. You have to pick the right orientation, fonts, sizing, color schemes, position, etc etc. There's actually quite a lot of components that go into a map, and there are definitely some that are better than others in terms of design. I took two semesters of cartography classes. In the first one, we used Adobe Illustrator a lot in conjunction with mapping programs. If you're in an art related field, I'm sure Illustrator is no big deal, but I had personally never used it before, and I really enjoyed it. Looking at all the maps from each member of the class, there were some students in the class who were more scientifically (than artistically) inclined lol.


In this class, we even learned how to use Adobe Flash for maps! (Again, probably not a big deal if you're in the graphic/arts field, but very exciting for me because I never thought I would get to learn how to use a program like that as a Geography major!)
One of my favorite classes was Field Mapping. It's not directly related to the work I did in my GIS or cartography classes in terms of main subject matter, but all are kind of intertwined with the final product, of course. This was actually a Saturday course which almost made me not want to take it since it was scheduled for 08:30am to 04:00pm every Saturday, but I heard great things about the course and the teacher, and I could not have made a better decision to take it. It was awesome. I was introduced to so many tools and programs that I probably never would have touched or even thought about if not for this class. We started off with just easy stuff like creating a map based on distance and a compass (for angle) and then vice versa, but then graduated to using a GPS unit to navigate and plot points. We even got to work with alidades!


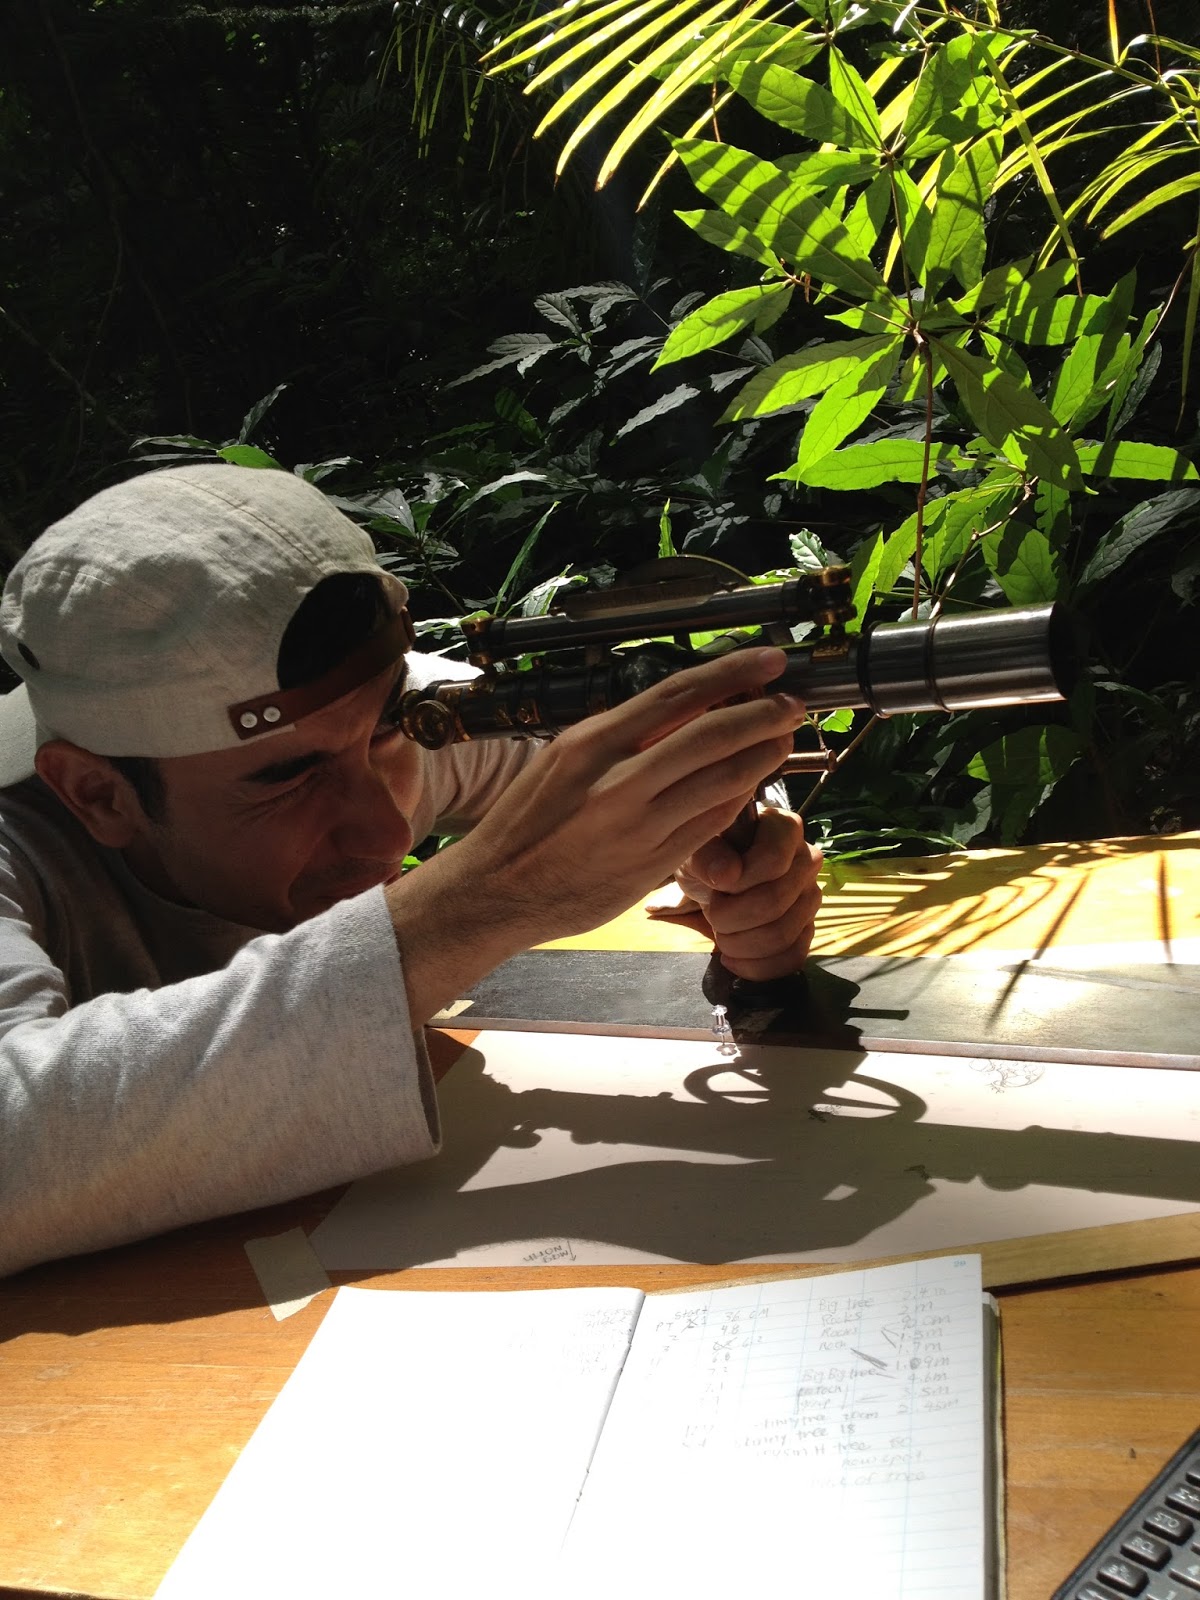


 For certain projects, we would use one total station and several prisms lol (see left). We're trying to accurately show the extent of the grass. So the rods are all lined up along the grass and the person operating the total station will be "shooting" each of the prisms (left to right). When the prism on the left is captured, that guy will move to the right of the line and the person on the total station would just continue to "shoot" prisms down the line until we finished the extent of the grass line. (Hope that makes sense lol.) I don't know if how I explained it sounds really boring, but really I loved doing this! Actually I mostly volunteered to take notes in our 3 person team (1 person operating the total station, 1 person holding the prism, 1 person taking notes) because that was most important to me (to have good notes), but I also liked doing each of the other parts as well and we rotated fairly. Total stations can be sooo wildly accurate and I just love that. I mean, technology!! Come on!! (wtf) After we were done, we usually processed the data in AutoCAD which would show all the point features we took. Then we could further process with other GIS and/or cartography software to get a final map.
 Geography Club
 This isn't part of the curriculum (it's a club so it's obviously extra-curricular) but I also wanted to share about the Geography Club at my school! It was kind of defunct in the first years I was in the program, but during my last year, a few of my classmates decided they wanted to revamp it and build it anew. I was someone they asked to be a part of it and was essentially the secretary for the club. We didn't have a lot of members, but enough to make events fun. Some of the activities we did were hiking, whale watching, aerial photography and beach clean ups and things like that. Anything you could relate to geography was a possible activity - which is basically almost anything outdoors lol. Plus there was the occasional geography-related movie night. The hikes were probably the most popular though. One of the Geography graduate students was actually focusing on drones/aerial photography with kites, and he had some equipment he let us use, so on most hikes, we would try to set it up once we got to the top and take a few photos.
For some reason I don't remember which hike this is...
But it's a nice view lol. So first you need to set up the kite and anchor it to something.


As a club, we also did some kite photography at this fishpond area.


We used a member's Jeep as the anchor this time because the wind could get pretty strong and we didn't really have anything else (like a good tree or something) to use in this open field.


For this particular set up, we can't see what the photos look like as we are taking them, but there are more complicated/better set ups where you can. However, that usually adds a lot of weight to the camera because it requires more battery, so this is a lighter and simpler option. You just might need to take a lot more pictures since you have to guess as to whether or not the pictures will show the area you want lol. The grad student who lent us this equipment actually built it himself! So that's kind of like where Geography can intersect with Engineering imo. And actually there is a bit of crossover with GIS and Engineering in general.
Here's just a few more photos of us learning how to use the kite. I just love some of these photos so I wanted to share them lol. I didn't control the kite much myself, so I stuck to taking photos...of the kite taking photos.
On the left below is a meter to check wind speeds and on the right is a close up of the camera equipment that goes up with the kite. You can see the rudder to help direct it with the wind lol.


This is something I know I wouldn't have gotten into if I wasn't a Geography student and another one of those things I just think is so cool lol. I'm glad someone thought to revamp the Geography Club. Honestly, it just sounds like something really lame, especially to non-Geography students, but with the right flyer design and plastering it in enough places, we were actually able to get some students we didn't even know that weren't already part of the Geography department to come out to some of the hiking events despite the name of the club lol.
Sorry I know some of these descriptions (especially pertaining to the Geography Club stuff) were kind of shotty. I wish I had been blogging while I was a student so I could have shared the most accurate and detailed version of these things with you! But now I'm just trying to pull things from memory based on some photos I took and that's not the best lol. But hopefully you still got a little glimpse of what it could be like to be a Geography major!
I think I've already gone into more detail than I initially intended, so I'm going to split this post here. I'll have another upcoming blog post dealing more with the vocational side of Geography in relation to my experience as a geotech-specific Geography major.
Hope there was at least a little info here that you didn't know before (and probably didn't need to) if you actually made it to the bottom of the post! If you have any questions, I'd be happy to try and answer them, but it's been two years since I graduated so tbh I'm a little rusty with some of the intricacies of what I did as a student since I wiped them from my memory lol. I'll do my best though! This doesn't necessary definitively represent the average Geography student's experience in college, but I did have a great time in my program, so I did want to share in case it might be helpful to someone in the future. Geography can be so many things and be used is so many ways.
And P.S. I am actually really bad at knowing what countries are where or what is the capital of whatever so that's really not an essential part of it imo. (Although of course those are generally good things to know lol.)
 I bought a selfie stick! It really wasn't something I thought I was going to purchase, but I think it will be good for a few trips I have coming up. One of those will actually have quite a few people in the party, so this will hopefully enable me to take a picture of all of us at the same time without having to ask someone else to take it or sacrifice one person to be the photographer! ...Also I had an Amazon gift card, and I didn't know what else to do with it lol.


 Overall, I'm not unhappy I purchased it, and I'm sure I'll use it a bit, but I've had it for about a month now and don't reach for it often. I'm not yet one of those people who carries it with them everywhere so that's probably why lol. That being said, I look forward to using it on upcoming trips for sure! The product works well as intended, and it's great for a second option for self shots and especially group shots.