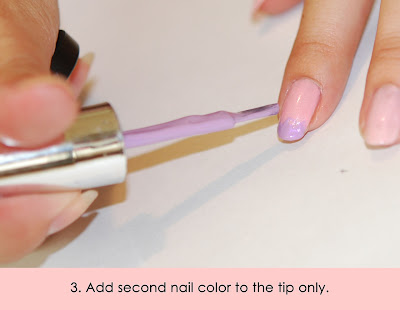
(This step is optional. I often do a gradient without a base color)
I sometimes follow this step and sometimes I don't. It really depends on the opacity and color of your second nail polish color (black versus a pale pink). I apply polish from the brush directly onto the tips because I need the strongest color there. If you're dabbing it on, it takes longer to achieve that if the color is light. If you want to skip this step, you can just apply the polish with the sponge more times at the top.
I found that tearing off a corner of the sponge and creating a curved surface can help with the application. I apply the color to the whole of the curve for first application and then when I'm doing touch ups, apply it only on the outside edge,
Repeat this step as many times as necessary.
When I'm doing a gradient without a base color, I'll do a half coat of glitter on the tip and then a second, light coat of glitter from around 1/3 from the base of my nail to the tip so the glitter is denser at the tip.

with a base color
without a base color

Here are my most commonly used nail polishes for the gradients that I do -
OPI "Teenage Dream" is my most favorite glitter polish of all time. I love the slightly pink base and how the glitter shines. I have 3 or 4 bottles of it. As I use each bottle, the polish/formula gets thicker (less polish, more glitter), so I use a different bottle depending on how much glitter I want applied for the design.

I posted this tutorial on tumblr awhile ago because someone asked me about it, but I had a really hard time taking the close up photos of my own hands for some reason (probably because I was trying to get the camera to shoot at a downward angle without a tripod wtf).


Cute omg! Thank you for posting this, I'm going to give this a try. ♡
ReplyDeleteDay Dreaming
No problem! Hope it works!
DeleteAwww, thanks for doing this ^.^ I really love your gradient nails so I'm definitely gonna try it soon!! Teenage Dream is a really great glitter IMO. I have a mini of it but I should really consider a big one.
ReplyDeleteTbh I'm only sad that I didn't buy more haha.
DeleteNaw, really!?!? There's a lot of different glitters and top coats out right now so I'm sure you would be able to find something similar easily enough.
DeleteI actually have 2 or 3 dupes (because the OPI one is not cheap) but so far I like the Teenage Dream the best...probably because its from OPI though. Although one of the ones that I bought was this skinny $14 polish from Sephora - bought it with a gift card because I rarely find anything to buy in there. Probably my standards are absurdly high for some reason lol.
DeleteIt looks beautiful *_* I should try this when my nails successfully grow out! I also appreciate you posting what nail polishes you mainly use because I always wonder what colours you use.
ReplyDeleteHaha the glitter really helps!
DeleteThanks for the tutorial! I'm definitely going to try this after my nails grow out~ ^^
ReplyDeleteNp! I had no idea people would actually find this helpful. I should have posted it earlier lol!
DeleteSo cute! I will definitely try this tutorial, it was so helpful! :) <3
ReplyDeleteThank you. Good luck!
DeleteNice tutorial Emiii! Your nails look so pretty! Thanks for this tutorial. :D
ReplyDeleteGradient nails are really nice especially if they're in pastels. Tbh I've never coloured/decorated my nails before (colouring them in red using pens when I was little doesn't count) but I really like seeing them on other people! :D
Thank you! I think I can only do these well in pastels because the color is not so stark and the glitter will cover the mistakes tbh lol.
DeleteThank you for the tutorial, this is so helpful. I'll definitely try this out once my nails grow longer.
ReplyDeleteI think i'll try doing a gradient it without the base coat. :3
Without the base coat is much faster and easier imo lol (although some people hate how it looks "unfinished"?? but to me it just makes it less obvious when your nail grows and you haven't changed your polish). I'm wearing that right now actually haha.
DeleteThank you so much for this tutorial! I miss doing my nails I used to be on top of them so much! May I ask what glue do you use to attach the rhinestones to your nails?
ReplyDeleteHi sorry for the late response! I usually just use a top coat/clear polish but for bigger pieces some times I use nail glue/super glue
DeleteHey Emiii!
ReplyDeleteWow, great and simple tutorial! I'll have to try it now since I stop bitting my nails! ^0^//
<3 Sachiko
Let me know how it goes! I'm actually not really good at it myself...I just use a lot of glitter and then filter the photo before posting LOL.
DeleteWell okay sometimes it comes out A+ but 75% of the time, it's only good from far away. It depends on the quality of the polishes I'm using and...my patience that day haha.
I love your nails! How do you get them to be so long and not chip?
ReplyDeleteThank you! They actually do chip quite often. But I change my polish every week and file and shape them then and look out for things like that. Also, I usually put on like 4-5 coats of nail polish which I think unintentionally helps sturdy them up a bit even though I'm not using a specific strengthening polish if that makes sense.
Delete